mysql雙主+keepalived
《mysql雙主+keepalived》要點:
本文介紹了mysql雙主+keepalived,希望對您有用。如果有疑問,可以聯系我們。
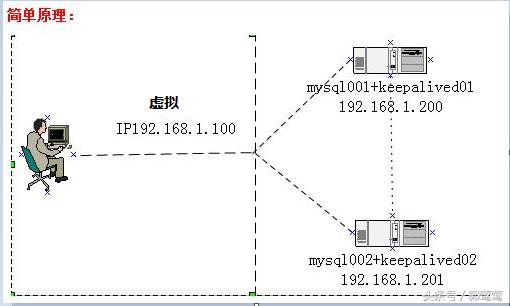
簡單原理
1、在兩臺服務器上分別部署雙主keepalived,主keepalived會在當前服務器配置虛擬IP用于mysql對外提供服務
2、在兩臺服務器上分別部署主主mysql,用于故障切換
3、當mysql服務器掛掉后,主keepalived會降低當前機器權重,備keepalived服務器會把虛擬IP搶過來配置在備服務器上,使備服務器的mysql能接替工作繼續對外提供服務
4、由于keepalived只能檢測服務器是否宕機來實現故障自動切換,但不能針對應用級別(mysql)的檢測,因此,需要編寫腳本實時監測mysql服務是否運行正常,當檢測mysql運行不正常時就降低權重,來實現故障自動切換
角色分配:
| IP地址 | 部署應用 |
|---|---|
| 192.168.1.200 | mysql001+keepalived01 |
| 192.168.1.201 | mysql002+keepalived02 |
虛擬IP192.168.1.100初始配置在keepalived01,無需手動配置,keepalived會自動配置
準備工作:
#關閉iptables
service iptables stop
chkconfig iptables off
#關閉selinux
setenforce 0
修改/etc/selinux/config文件,將SELINUX=enforcing改為SELINUX=disabled
#同步主機時間
ntpdate 202.120.2.101
=====================================================================
一、配置mysql雙主服務
#用yum安裝mysql服務
yum install MySQL-shared-compat-5.6.23-1.el6.x86_64.rpm
yum install MySQL-server-5.6.23-1.el6.x86_64.rpm
yum install MySQL-client-5.6.23-1.el6.x86_64.rpm
yum install MySQL-devel-5.6.23-1.el6.x86_64.rpm
yum install MySQL-shared-5.6.23-1.el6.x86_64.rpm
#創建數據目錄
mkdir -pv /home/mydata/data
chown -R mysql.mysql /home/mydata
chmod -R +w /home/mydata
#修改主配置文件
vi /etc/my.cnf
#在mysql001上
[mysqld]
datadir = /home/mydata/data #mysql的數據存放位置
port = 3306 #mysql的端口號
socket = /var/lib/mysql/mysql.sock
log-bin = master-bin
server_id = 1 #mysql的ID號
log-bin = mysql-bin
relay-log = mysql-relay-bin
replicate-wild-ignore-table = mysql.%
replicate-wild-ignore-table = test.%
replicate-wild-ignore-table = information_schema.%
skip-external-locking
key_buffer_size = 256M
max_allowed_packet = 1M
table_open_cache = 256
pid-file = /home/mydata/data/mysql.pid
sort_buffer_size = 1M
read_buffer_size = 1M
read_rnd_buffer_size = 1M
myisam_sort_buffer_size = 64M
thread_cache_size = 8
query_cache_size= 16M
innodb_file_per_table = on
thread_concurrency = 8
skip_name_resolve = on
sql_mode=NO_ENGINE_SUBSTITUTION,STRICT_TRANS_TABLES
#在mysql002上
[mysqld]
datadir = /home/mydata/data
port = 3306
socket = /var/lib/mysql/mysql.sock
log-bin = master-bin
server_id = 2
log-bin = mysql-bin
relay-log = mysql-relay-bin
replicate-wild-ignore-table = mysql.%
replicate-wild-ignore-table = test.%
replicate-wild-ignore-table = information_schema.%
skip-external-locking
key_buffer_size = 256M
max_allowed_packet = 1M
table_open_cache = 256
pid-file = /home/mydata/data/mysql.pid
sort_buffer_size = 1M
read_buffer_size = 1M
read_rnd_buffer_size = 1M
myisam_sort_buffer_size = 64M
thread_cache_size = 8
query_cache_size= 16M
innodb_file_per_table = on
thread_concurrency = 8
skip_name_resolve = on
sql_mode=NO_ENGINE_SUBSTITUTION,STRICT_TRANS_TABLES
#初始化mysql
/usr/bin/mysql_install_db --datadir=/home/mydata/data --user=mysql
#相互為對方主機授權復制賬號
grant replication slave on *.* to 'repl_user'@'192.168.%.%' identified by 'repl_passwd';
#查看master的狀態
show master status;
#授權給check用戶,用來檢測mysql
grant replication client on *.* to 'check'@'localhost' identified by 'check';
#配置對方為自己的master
在mysql001上:
change master to \
master_host='192.168.1.201',
master_user='repl_user',
master_password='repl_passwd',
master_log_file='mysql-bin.000003',
master_log_pos=333; 【這個數字是上面show master status;】
在mysql002上:
change master to \
master_host='192.168.1.200',
master_user='repl_user',
master_password='repl_passwd',
master_log_file='mysql-bin.000003',
master_log_pos=333;
#啟動服務,兩臺機器上都執行
start slave;
#查看是否運行正常
show slave status\G;
二、配置keepalived
在mysql001上:
vi /etc/keepalived/keepalived.conf
#######################################################
! Configuration File for keepalived
global_defs {
notification_email {
2011820123@qq.com
}
notification_email_from keepalived@localhost
smtp_server 127.0.0.1
smtp_connect_timeout 30
router_id MYSQL_DEVEL
}
vrrp_script check_mysqld { #設置檢測腳本
script "/etc/keepalived/check.sh" #指定檢測腳本的存放位置
interval 2 #間隔時間
weight -51 #權重,降權51
}
vrrp_instance VI_1 {
state BACKUP #注意,這里兩臺服務器都要是BACKUP
interface em1
virtual_router_id 60
priority 100
nopreempt
authentication {
auth_type PASS
auth_pass 1111
}
track_script {
check_mysqld
}
virtual_ipaddress {
192.168.1.100 #虛擬IP
}
}
#######################################################
在mysql002上:
vi /etc/keepalived/keepalived.conf
#######################################################
! Configuration File for keepalived
global_defs {
notification_email {
2011820123@qq.com
}
notification_email_from keepalived@localhost
smtp_server 127.0.0.1
smtp_connect_timeout 30
router_id MYSQL_DEVEL
}
vrrp_script check_mysqld {
script "/etc/keepalived/check.sh"
interval 2
weight -51
}
vrrp_instance VI_1 {
state BACKUP #注意,這里兩臺服務器都要是BACKUP
interface em1
virtual_router_id 60
priority 90
authentication {
auth_type PASS
auth_pass 1111
}
track_script {
check_mysqld
}
virtual_ipaddress {
192.168.1.100
}
}
#######################################################
"state BACKUP”,在這里兩臺服務器要都設為BACKUP,如果一臺是MASTER,另一臺是BACKUP,那么當MASTER恢復數據之后,主keepalived要切換到MASTER上,這樣BACKUP上的數據就會丟失.因此在這兩臺mysql服務器上都設置成BACKUP,那么當MASTER恢復后,不會自動切換回去
#重啟keepalived服務
service keepalived restart
五、編輯mysql監控腳本
vi /etc/keepalived/check.sh
#######################################################
#/bin/bash
live=`ss -tnlp | grep 3306 | wc -l` #檢查mysql的3306端口是否存在
yes=`mysql -ucheck -pcheck -e "show slave status\G" | head -13 | tail -2 | awk -F: '{print $2}' | grep Yes | wc -l` #檢查‘show slave status’是否正常
if [ $live -ge 1 ];then #如果$live大于等于1,執行下步操作
if [ $yes -eq 2 ];then #如果‘show slave status’出現兩個yes,就退出
exit 0
else
/etc/init.d/keepalived restart #否則,重啟keepalived服務,退出
exit 1
fi
else
/etc/init.d/keepalived restart #如果$live小于1,那么重啟keepalived服務
exit 1
fi
#######################################################
#給腳本執行權限
chmod +x /etc/keepalived/check.sh
歡迎參與《mysql雙主+keepalived》討論,分享您的想法,維易PHP學院為您提供專業教程。
同類教程排行
- Mysql實例mysql報錯:Deadl
- MYSQL數據庫mysql導入sql文件
- MYSQL的UTF8MB4編碼排序要用u
- MYSQL教程mysql自定義split
- 如何打造MySQL高可用平臺
- MYSQL創建表出錯Tablespace
- Mysql必讀MySQL中CLIENT_
- MYSQL數據庫mysql常用字典表(完
- Mysql應用MySql的Communi
- Mysql入門解決MySQL Sendi
- Mysql必讀關于skip_name_r
- MYSQL數據庫MySQL實現兩張表數據
- Mysql實例使用dreamhost空間
- MYSQL數據庫mysql 查詢表中平均
- MYSQL教程mysql 跨表查詢、更新