LINUX學(xué)習(xí):PXE+DHCP+TFTP+Cobbler 無人值守安裝CentOS 7
《LINUX學(xué)習(xí):PXE+DHCP+TFTP+Cobbler 無人值守安裝CentOS 7》要點:
本文介紹了LINUX學(xué)習(xí):PXE+DHCP+TFTP+Cobbler 無人值守安裝CentOS 7,希望對您有用。如果有疑問,可以聯(lián)系我們。
Cobbler(補鞋匠)是通過將DHCP、TFTP、DNS、HTTP等服務(wù)進(jìn)行集成,創(chuàng)立一個中央管理節(jié)點,其可以實現(xiàn)的功能有配置服務(wù),創(chuàng)立存儲庫,解壓縮操作系統(tǒng)媒介,代理或集成一個配置管理系統(tǒng),控制電源管理等. Cobbler的最終目的是實現(xiàn)無需進(jìn)行人工干預(yù)即可安裝機(jī)器.
? pxe概述
? 預(yù)啟動執(zhí)行環(huán)境(Preboot eXecution Environment,PXE,也被稱為預(yù)執(zhí)行環(huán)境)是讓計算機(jī)通過網(wǎng)卡獨立地使用數(shù)據(jù)設(shè)備(如硬盤)或者安裝操作系統(tǒng)
? ? PXE Client發(fā)送廣播包哀求DHCP分配IP地址DHCP
? ? Server回復(fù)哀求,給出IP地址以及Boot
? ? Server的地址PXE下載引導(dǎo)文件執(zhí)行引導(dǎo)程序
總結(jié)來說,
pxe客戶端會挪用網(wǎng)際協(xié)議(ip)、用戶數(shù)據(jù)報協(xié)議(udp)、動態(tài)主機(jī)設(shè)定協(xié)議(DHCP)、小型文件傳輸協(xié)議(TFTP)
pxe客戶端(client)指機(jī)器在pxe啟動進(jìn)程中的角色.一個pxe客戶端可以是一臺服務(wù)器、筆記本電腦或者其他裝有pxe啟動代碼的機(jī)器
PXE主要是通過廣播的方式發(fā)送一個包,并請注獲取一個地址,而后交給TFTP法式下載一個引導(dǎo)文件.
cobbler和Kickstart批量裝機(jī)軟件
?Cobbler由python語言開發(fā),是對PXE和Kickstart以及DHCP的封裝.融合很多特性,提供了CLI和Web的管理形式.更加便利的實行網(wǎng)絡(luò)安裝.同時,Cobbler也提供了API接口,使用其它語言也很容易做擴(kuò)展.它不緊可以安裝物理機(jī),同時也支持kvm、xen虛擬化、Guest OS的安裝.更多的是它還能結(jié)合Puppet等集中化管理軟件,實現(xiàn)自動化的管理.
? Kickstart 是一種無人值守的安裝方式,它的工作原理是在安裝過程中記錄人工干預(yù)填寫的各種參數(shù),并生成一個名為ks.cfg的文件.我們可以簡單理解為一個自動安裝應(yīng)答配置管理法式.通過讀取這個配置文件,系統(tǒng)知道怎么去分區(qū),要安裝什么包,配什么IP,優(yōu)化什么內(nèi)核參數(shù)等等?
? 一句話總結(jié):Cobbler補鞋匠是對Kickstart的封裝,簡化安裝步調(diào)、使用流程,官方號稱補鞋匠都能學(xué)會的批量裝機(jī).
Cobbler 事情流程
server端:
? ? 第一步,啟動Cobbler服務(wù)
? ? 第二步,進(jìn)行Cobbler差錯檢查,執(zhí)行cobbler check命令
? ? 第三步,進(jìn)行配置同步,執(zhí)行cobbler sync命令
? ? 第四步,復(fù)制相關(guān)啟動文件文件到TFTP目錄中
? ? 第五步,啟動DHCP服務(wù),提供地址分配
? ? 第六步,DHCP服務(wù)分配IP地址
? ? 第七步,TFTP傳輸啟動文件
? ? 第八步,Server端接收安裝信息
? ? 第九步,Server端發(fā)送ISO鏡像與Kickstart文件
Client端:
? ? 第一步,客戶端以PXE模式啟動
? ? 第二步,客戶端獲取IP地址
? ? 第三步,通過TFTP服務(wù)器獲取啟動文件
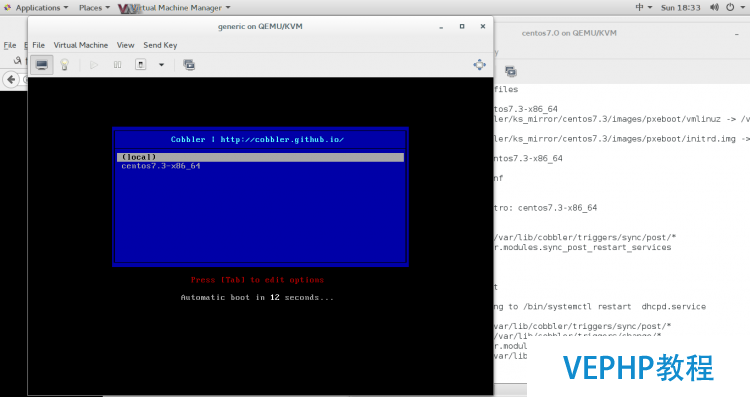
? ? 第四步,進(jìn)入Cobbler安裝選擇界面
? ? 第五步,客戶端確定加載信息
? ? 第六步,根據(jù)配置信息準(zhǔn)備安裝系統(tǒng)
? ? 第七步,加載Kickstart文件
? ? 第八步,傳輸系統(tǒng)安裝的其它文件
? ? 第九步,進(jìn)行安裝系統(tǒng)
正式情況準(zhǔn)備:
? 1.網(wǎng)絡(luò)環(huán)境:host-only、nat網(wǎng)絡(luò),因為Cobbler需要用到本身的dhcp服務(wù)器,所以為了防止都在同一個網(wǎng)絡(luò)造成dhcp獲取混亂,需要切換網(wǎng)絡(luò)!~?
? 2.類似安裝服務(wù)必要的環(huán)境準(zhǔn)備:1,關(guān)閉iptables,selinux 2,配置靜態(tài)IP、設(shè)置主機(jī)名 并且在hosts文件下綁定 3.時間同步 4.配置當(dāng)?shù)豬so鏡像里的yum倉庫,163源epel源 (安裝軟件)
cobbler server? ? -------? ? client
? ? ? ? ? ? ? ? ? 192.168.100.221/24? ------------------------------------? 裝機(jī)時候由DHCP自動設(shè)置裝備擺設(shè)
一.? 在cobbler server上安裝cobbler
? yum install cobbler cobbler-web tftp* rsync xinetd http* syslinux dhcp* pykickstart
?報錯辦理:提示--skip-broken ,檢查發(fā)現(xiàn)自己yum源不全yum無法安裝上面三個依賴包.補全yum源辦理
安裝完成,啟動軟件
[root@bokeyuan ~]# systemctl restart cobblerd.service
[root@bokeyuan ~]# systemctl restart httpd.service
[root@bokeyuan ~]# systemctl enable cobblerd.service //開機(jī)自啟動
Created symlink from /etc/systemd/system/multi-user.target.wants/cobblerd.service to /usr/lib/systemd/system/cobblerd.service.
[root@bokeyuan ~]# systemctl enable httpd.service //開機(jī)自啟動
Created symlink from /etc/systemd/system/multi-user.target.wants/httpd.service to /usr/lib/systemd/system/httpd.service.
為什么啟動apache?血的教訓(xùn),排了很久.不先啟動apache 后續(xù)cobbler check 報python file 的差錯!!!
二.根本配置
[root@bokeyuan ~]# cobbler check
The following are potential configuration items that you may want to fix:1 : The 'server' field in /etc/cobbler/settings must be set to something other than localhost, or kickstarting features will not work.? This should be a resolvable hostname or IP for the boot server as reachable by all machines that will use it.
2 : For PXE to be functional, the 'next_server' field in /etc/cobbler/settings must be set to something other than 127.0.0.1, and should match the IP of the boot server on the PXE network.
3 : change 'disable' to 'no' in /etc/xinetd.d/tftp
4 : some network boot-loaders are missing from /var/lib/cobbler/loaders, you may run 'cobbler get-loaders' to download them, or, if you only want to handle x86/x86_64 netbooting, you may ensure that you have installed a *recent* version of the syslinux package installed and can ignore this message entirely.? Files in this directory, should you want to support all architectures, should include pxelinux.0, menu.c32, elilo.efi, and yaboot. The 'cobbler get-loaders' command is the easiest way to resolve these requirements.
5 : enable and start rsyncd.service with systemctl
6 : debmirror package is not installed, it will be required to manage debian deployments and repositories7 : The default password used by the sample templates for newly installed machines (default_password_crypted in /etc/cobbler/settings) is still set to 'cobbler' and should be changed, try: "openssl passwd -1 -salt 'random-phrase-here' 'your-password-here'" to generate new one
8 : fencing tools were not found, and are required to use the (optional) power management features. install cman or fence-agents to use them
Restart cobblerd and then run 'cobbler sync' to apply changes.
?一步步辦理上述需求,部分需求可忽略.個體差異不同 每個人需求數(shù)量也不同,基本上大同小異
解決需求1、2、7
# openssl passwd -1 -salt 'werwqerwqr' '123456'? ? ? ? --123456為暗碼(這是自動安裝客戶端系統(tǒng)成功后的root登錄暗碼),werwqerwqr為隨機(jī)字節(jié)干擾碼(隨便寫)
$1$werwqerw$.prcfrYFbwuvkD8XspayN.
# vim /etc/cobbler/settings
384 server: 192.168.100.221 ? --換成cobbler服務(wù)器端的IP
272 next_server: 192.168.100.221 ? --同上
101 default_password_crypted: "$1$werwqerw$.prcfrYFbwuvkD8XspayN."? --把暗碼字符串換成你上面產(chǎn)生的字符串(此暗碼為客戶機(jī)安裝后的root登錄暗碼)
解決需求3
# vim /etc/xinetd.d/tftp
? ? ? ? disable = no? ? --yes改為no
辦理需求5
#systemctl restart rsyncd.service
#systemctl enable? rsyncd.service
辦理需求8
# yum install fence-agents
OK,剩下的需求像
4 : some network boot-loaders are missing from /var/lib/cobbler/loaders, you may run 'cobbler get-loaders' to download them, or, if you only want to handle x86/x86_64 netbooting, you may ensure that you have installed a *recent* version of the syslinux package installed and can ignore this message entirely.? Files in this directory, should you want to support all architectures, should include pxelinux.0, menu.c32, elilo.efi, and yaboot. The 'cobbler get-loaders' command is the easiest way to resolve these requirements.
6 : debmirror package is not installed, it will be required to manage debian deployments and repositories
(問題4可以使用cobbler get-loaders辦理,但需要有外網(wǎng)和外網(wǎng)的yum源 跳過,現(xiàn)在是NAT模式;問題6 是關(guān)于debian系統(tǒng)的,我們這里可以忽略)
末了# systemctl restart cobblerd.service 重起下cobbler補鞋匠服務(wù)!
三.導(dǎo)入centos7.3的iso鏡像
我的環(huán)境iso鏡像掛載在/yum目錄,此拷貝步調(diào)時間較長
# cobbler import --path=/yum/ --name=centos7.3
# cobbler distro list? ?--導(dǎo)入成功后,確認(rèn)導(dǎo)入的鏡像名
? centos7.3-x86_64
# cobbler profile list? ?--導(dǎo)入成功后,確認(rèn)默認(rèn)的profile名
? centos7.3-x86_64
[root@bokeyuan ~]# cobbler import --path=/yum/ --name=centos7.3
task started: 2017-09-03_175701_import
task started (id=Media import, time=Sun Sep  3 17:57:01 2017)
Found a candidate signature: breed=RedHat, version=rhel6
Found a candidate signature: breed=redhat, version=rhel7
Found a matching signature: breed=redhat, version=rhel7
Adding distros from path /var/www/cobbler/ks_mirror/centos7.3:
creating new distro: centos7.3-x86_64
trying symlink: /var/www/cobbler/ks_mirror/centos7.3 -> /var/www/cobbler/links/centos7.3-x86_64
creating new profile: centos7.3-x86_64
associating repos
checking for rsync repo(s)
checking for rhn repo(s)
checking for yum repo(s)
starting descent into /var/www/cobbler/ks_mirror/centos7.3 for centos7.3-x86_64
processing repo at : /var/www/cobbler/ks_mirror/centos7.3
need to process repo/comps: /var/www/cobbler/ks_mirror/centos7.3
looking for /var/www/cobbler/ks_mirror/centos7.3/repodata/*comps*.xml
Keeping repodata as-is :/var/www/cobbler/ks_mirror/centos7.3/repodata
*** TASK COMPLETE ***?
四.改動dhcp配置
# vim /etc/cobbler/dhcp.template --在此文件的第21行到第25行改動成你對應(yīng)的網(wǎng)段和ip? ?
subnet 192.168.100.0 netmask 255.255.255.0 {
? ? option routers? ? ? ? ? ? 192.168.100.221;
? ? option domain-name-servers 192.168.100.221;
? ? option subnet-mask? ? ? ? 255.255.255.0;
? ? range dynamic-bootp? ? ? ? 192.168.100.100 192.168.100.254;
--圖形的操作進(jìn)程這里省略后續(xù)還有這一步 重要
# vim /etc/cobbler/settings? ?--再去修改這個配置文件,改成dhcp服務(wù)由cobbler來管理
242 manage_dhcp: 1? ? ? ?--把0改為1
#? systemctl restart cobblerd.service? --保留后,再重啟此服務(wù)
五.使用cobbler sync同步,并啟動xinetd服務(wù)
下面的cobbler sync 很重要,如果這步報錯必定要排出來,就經(jīng)驗來說這步出錯一般是IP配置出錯,記得細(xì)心一點,個體差異不用就不詳細(xì)表述~
# cobbler sync
# systemctl restart xinetd.service
# systemctl enable xinetd.service
六.新建另一個虛擬機(jī) 選擇網(wǎng)絡(luò)安裝PXE (保證相同私有網(wǎng)絡(luò),而且最好2G內(nèi)存,內(nèi)存小的話會在安裝時報空間不夠的錯誤),進(jìn)行安裝測試
 ? ?
? ?
安裝完成后,變動boot引導(dǎo)

更多詳情見請繼續(xù)閱讀下一頁的出色內(nèi)容:
_baidu_page_break_tag_自動安裝我們已經(jīng)實現(xiàn)了,但如何自定義我們想安裝的profile
重點就是你需要自定義一個ks文件
自定義ks文件的方法
1,如果你很熟悉此文件,直接拷別人的模版修改或者直接使用/root/anaconda-ks.cfg來修改
2,使用一個圖形工具system-config-kickstart來幫助你配置(下面我就是使用這種方法)
# yum install system-config-kickstart
# system-config-kickstart? ?
--圖形的操作過程這里省略
給大家兩個做好的ks.cfg文件參考:
第一個文件就是用來安裝CentOS7.3宿主機(jī)的ks文件,內(nèi)容如下:
#platform=x86, AMD64, or Intel EM64T
#version=DEVEL
# Install OS instead of upgrade
install
# Keyboard layouts
keyboard 'us'
# Root password
rootpw --iscrypted $1$6RbFC2nC$GBugZL7ACuGhck8DbUZgM/
# Use network installation
url --url="http://172.16.13.250/cobbler/ks_mirror/centos7.3/"
# System language
lang en_US
# Firewall configuration
firewall --disabled
# System authorization information
auth? --useshadow? --passalgo=sha512
# Use text mode install
text
firstboot --disable
# SELinux configuration
selinux --disabled
# Network information
network? --bootproto=dhcp --device=eth0
# Reboot after installation
reboot
# System timezone
timezone Asia/Shanghai --isUtc
# System bootloader configuration
bootloader --append="rhgb quiet" --location=mbr
# Clear the Master Boot Record
zerombr
# Partition clearing information
clearpart --all --initlabel
# Disk partitioning information
part /boot --fstype="xfs" --size=300
part swap --fstype="swap" --size=4000
part / --fstype="xfs"? --size=150000
part /data --fstype="xfs" --size=80000
%packages
@additional-devel
@desktop-debugging
@development
@fonts
@gnome-desktop
@input-methods
@kde-desktop
@legacy-x
@platform-devel
@remote-desktop-clients
@x11
initial-setup
initial-setup-gui
vinagre
%end
第二個文件是用來宿主機(jī)安裝雙系統(tǒng)的ks文件
#platform=x86, AMD64, or Intel EM64T
#version=DEVEL
# Install OS instead of upgrade
install
# Keyboard layouts
keyboard 'us'
# Root password
rootpw --iscrypted $1$6RbFC2nC$GBugZL7ACuGhck8DbUZgM/
# Use network installation
url --url="http://172.16.13.250/cobbler/ks_mirror/centos7.3/"
# System language
lang en_US
# Firewall configuration
firewall --disabled
# System authorization information
auth? --useshadow? --passalgo=sha512
# Use text mode install
text
firstboot --disable
# SELinux configuration
selinux --disabled
# Network information
network? --bootproto=dhcp --device=eth0
# Reboot after installation
reboot
# System timezone
timezone Asia/Shanghai --isUtc
# System bootloader configuration
bootloader --append="rhgb quiet" --location=mbr
# Clear the Master Boot Record
zerombr
# Partition clearing information
clearpart --none
# Disk partitioning information
part swap --fstype="swap" --size=4000
part / --fstype="xfs" --grow --size=1
%packages
@additional-devel
@desktop-debugging
@development
@fonts
@gnome-desktop
@input-methods
@kde-desktop
@legacy-x
@platform-devel
@remote-desktop-clients
@x11
initial-setup
initial-setup-gui
vinagre
%end
=========================================================================
# cobbler profile help? ?--查看幫助
# cobbler profile list? ?--查看有哪些profile
? centos7.3-x86_64? ?
# cobbler profile report --name=centos7.3-x86_64 |grep Kickstart
Kickstart? ? ? ? ? ? ? ? ? ? ? : /var/lib/cobbler/kickstarts/sample_end.ks? --這就是這個安裝方案的kickstart文件
Kickstart Metadata? ? ? ? ? ? : {}
我現(xiàn)在自定義一個ks文件,也想做成一個profile,步驟如下:
步驟一:
自定義ks文件(使用system-config-kickstart或直接找一個模版文件修改),得到如下的文件
# vim /var/lib/cobbler/kickstarts/centos7.3.ks? ?--復(fù)制下面一大段信息,粘到此文件里
#platform=x86, AMD64, or Intel EM64T
#version=DEVEL
# Install OS instead of upgrade
install
# Keyboard layouts
keyboard 'us'
# Root password
rootpw --iscrypted $1$6RbFC2nC$GBugZL7ACuGhck8DbUZgM/
# Use network installation
url --url="http://192.168.100.2/cobbler/ks_mirror/centos7.3/"
# System language
lang en_US
# Firewall configuration
firewall --disabled
# System authorization information
auth? --useshadow? --passalgo=sha512
# Use text mode install
text
firstboot --disable
# SELinux configuration
selinux --disabled
# Network information
network? --bootproto=dhcp --device=eth0
# Reboot after installation
reboot
# System timezone
timezone Asia/Shanghai --isUtc
# System bootloader configuration
bootloader --append="rhgb quiet" --location=mbr
# Clear the Master Boot Record
zerombr
# Partition clearing information
clearpart --all --initlabel
# Disk partitioning information
part /boot --fstype="xfs" --size=300
part swap --fstype="swap" --size=2000
part / --fstype="xfs" --grow --size=1
%post
rm /etc/yum.repos.d/* -rf
cat > /etc/yum.repos.d/local.repo << EOF
[base]
name=base
baseurl=file:///yum
enabled=1
gpgcheck=0
EOF
%end
%packages
@additional-devel
@desktop-debugging
@development
@fonts
@gnome-desktop
@input-methods
@kde-desktop
@legacy-x
@platform-devel
@remote-desktop-clients
@x11
initial-setup
initial-setup-gui
vinagre
%end
步驟二:把準(zhǔn)備好的ks文件做成一個新的profile
# cobbler profile add --name=new_centos7.3 --distro=centos7.3-x86_64? --kickstart=/var/lib/cobbler/kickstarts/centos7.3.ks
# cobbler profile list? ? ? ?--在原來基礎(chǔ)上就多了自定義的安裝方案
? centos7.3-x86_64
? new_centos7.3
步驟三:
測試
然后就可以新建一個客戶端虛擬機(jī),使用上面的new_centos7.3安裝名字來測試了
==================================================================
對上面操作的擴(kuò)展(僅供參考)
# cobbler profile edit --name=new_centos7.3 --kickstart=/var/lib/cobbler/kickstarts/xxx.ks? ?
# cobbler profile remove --name=new_centos7.3? ?
======================================================================
客戶端使用koan與服務(wù)器的cobbler聯(lián)系,實現(xiàn)自動重裝系統(tǒng)
客戶端需要安裝koan軟件包(epel源里就有)
# yum install koan ?
# koan --server=192.168.100.2 --list=profiles? ? ? --192.168.100.2為cobbler服務(wù)器IP,得到的結(jié)果和在cobbler服務(wù)器上cobbler profile list命令得到的結(jié)果一樣
? centos7.3-x86_64
? new_centos7.3
# koan --replace-self --server=192.168.100.2 --profile=new_centos7.3? --指定本客戶端依照名為new_centos7.3的profile重裝系統(tǒng)
# reboot? --敲完上面的命令,使用reboot,就會重裝了(沒敲上面的命令那reboot就是重啟)
本文永遠(yuǎn)更新鏈接地址:
學(xué)習(xí)更多LINUX教程,請查看站內(nèi)專欄,如果有LINUX疑問,可以加QQ交流《LINUX學(xué)習(xí):PXE+DHCP+TFTP+Cobbler 無人值守安裝CentOS 7》。
轉(zhuǎn)載請注明本頁網(wǎng)址:
http://www.fzlkiss.com/jiaocheng/7691.html
同類教程排行
- LINUX入門:CentOS 7卡在開機(jī)
- LINUX實戰(zhàn):Ubuntu下muduo
- LINUX教程:Ubuntu 16.04
- LINUX教程:GitBook 使用入門
- LINUX實操:Ubuntu 16.04
- LINUX教學(xué):Shell、Xterm、
- LINUX教程:Linux下開源的DDR
- LINUX實戰(zhàn):TensorFlowSh
- LINUX教學(xué):Debian 9 'St
- LINUX實戰(zhàn):Ubuntu下使用Vis
- LINUX實操:Kali Linux安裝
- LINUX教學(xué):openslide-py
- LINUX教學(xué):Linux 下 Free
- LINUX教學(xué):通過PuTTY進(jìn)行端口映
- LINUX教程:Ubuntu 16.04